Monday 31 December 2018

It's the End Of The Year Post

The End Of The Year Post!

Well 2018 has almost come to an end and it's been quite a year. We've settled into a routine between home and the OH's posting in Moray and work has gone bananas as the downturn in the industry came to an end. I've seen some great gigs and added a new Spider to the garage. 


Oh yeah and played some great games with some great folks too and managed to get my Wargaming the Sugar Islands book published too. 
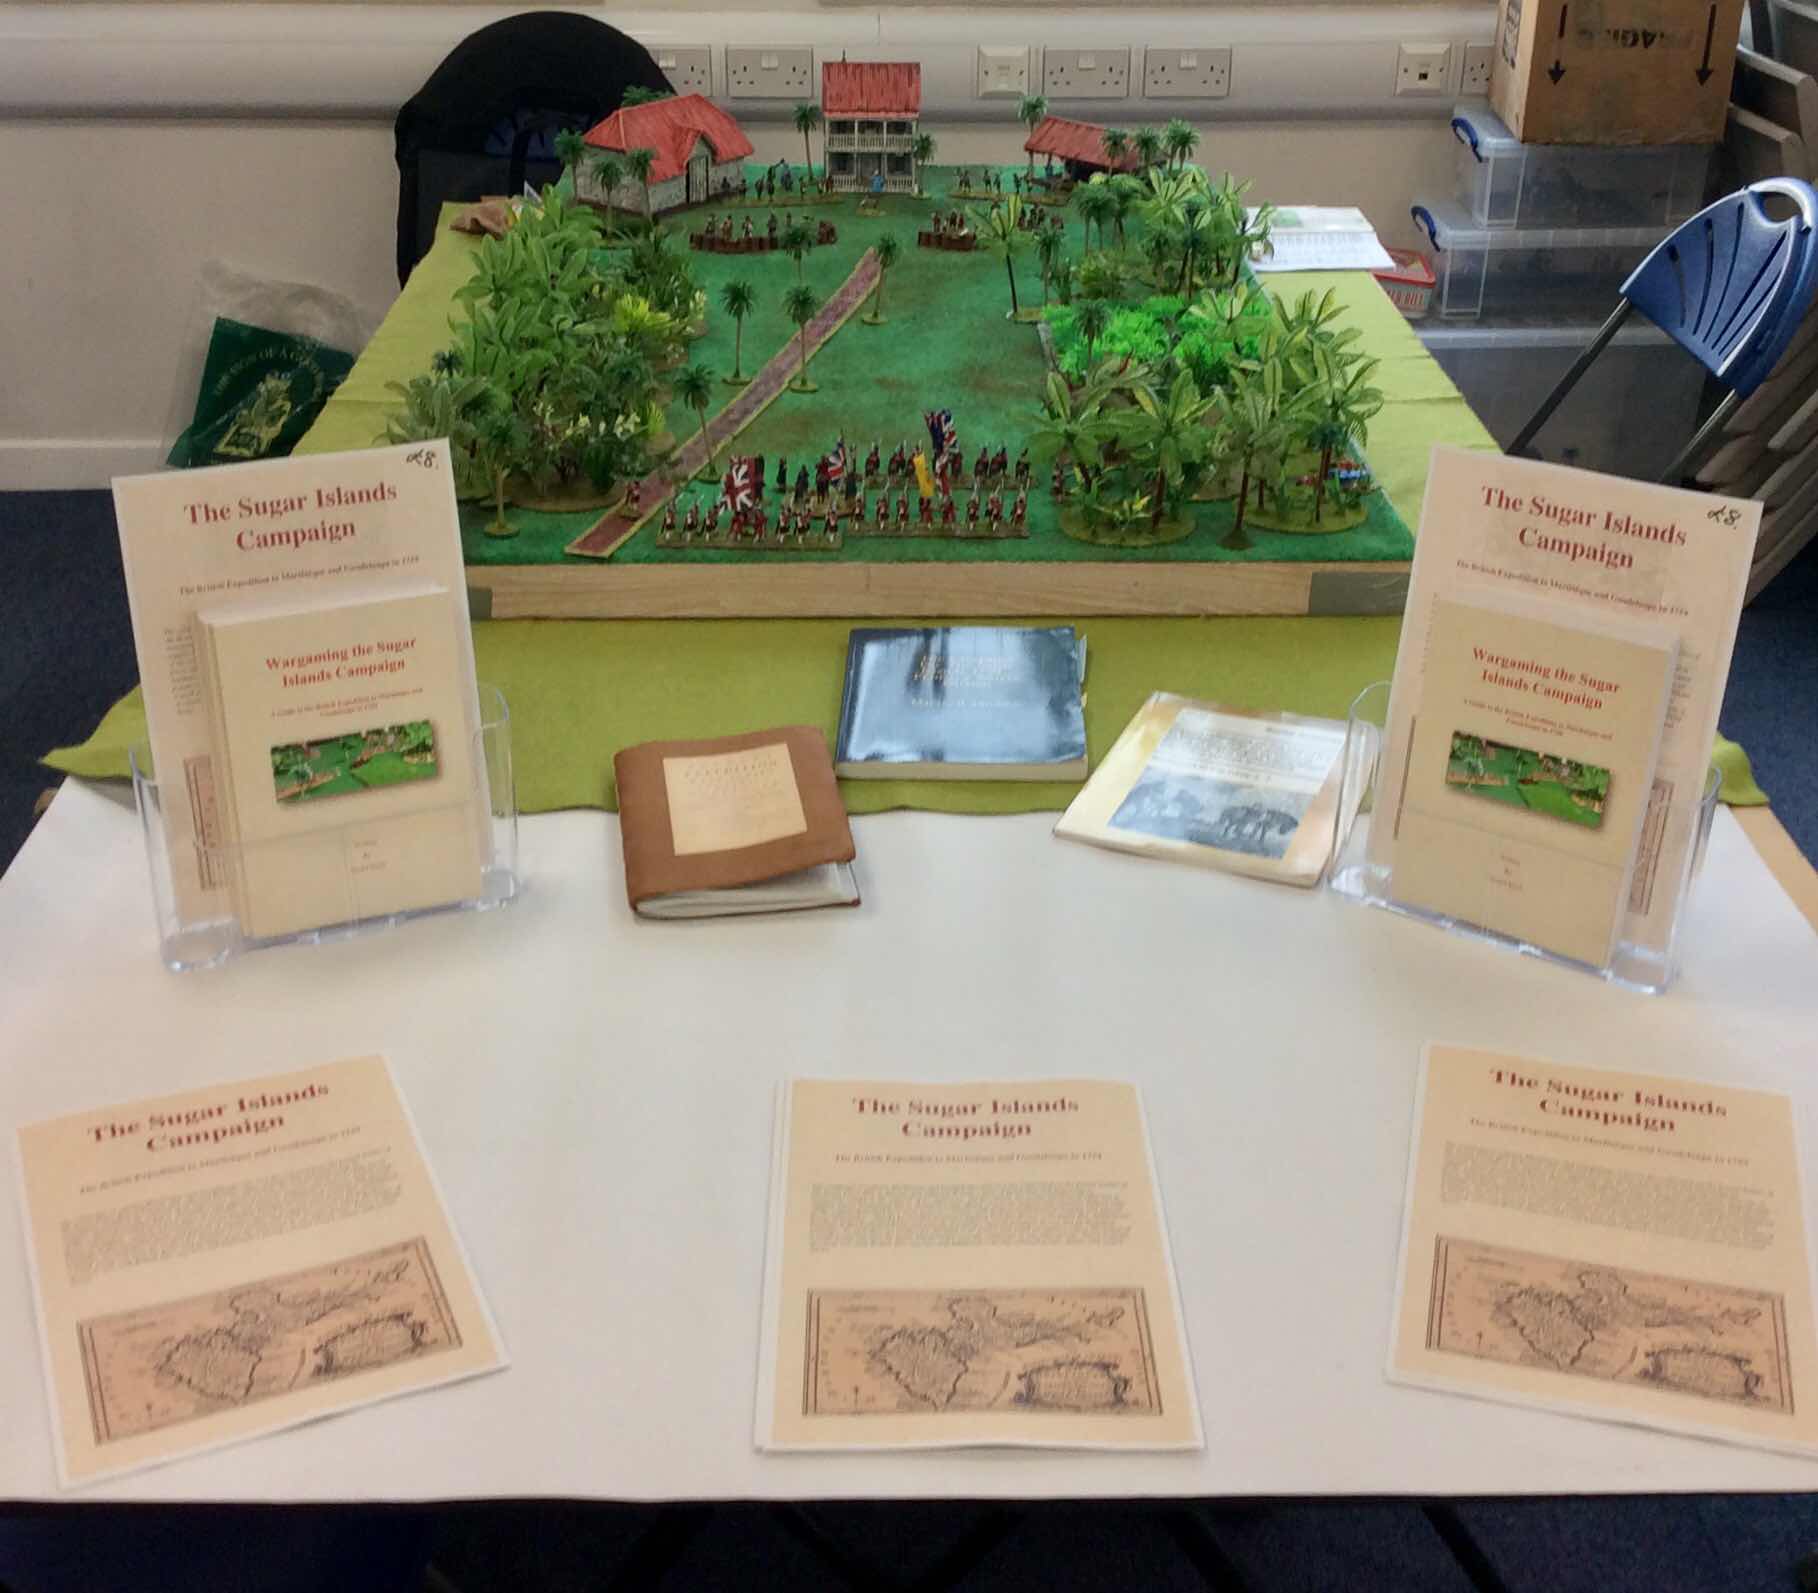
The Book
I started writing this in 2017, initially just to see if I could do it. It was published in November and I've managed to sell 65 copies in since then (more than I thought I would and far quicker too!), posted out to Australian and New Zealand, America and Canada, to the Uk and to Europe, to folk I've known for ages and some newer friends too, to visitors to my blog and to gamers who've read about it on other forums and sites or from other gamers. 


Thank you all. 


The feedback has been great and I've heard of versions of the scenarios being fought with Spanish and Brits as well with Great Northern War Russians and Swedes. There's plenty stock so anyone who wants a copy please use the contact form on the side of the blog and drop me a line.

There will be a sequel of sorts. The provisional title will be "Against Spain. The War of Jenkins Ear and the capture of Havana and Manila".

I have started gathering material, working from the original sources as much as possible once again. I have no publication date in mind as yet but will keep you up to date via the blog.

Campaign Cards
My next project is already well underway. Charles Grant and I have been working on a deck of campaign event cards that can be used to generate events to spice up your battles - morale and fire modifiers caused by weather or supplies, raids and skirmishes on your marching columns for you to fight out and some cards which deal with individual leaders and units. As well as the printed cards there will be blank ones for you to customise yourself. 
We will be finalising the design after the holidays and hopefully have things ready well before Easter.


Games
I've had some great games with my local club, the lads at Oldmeldrum Wargames Group. They were great help testing the scenarios for the book and we've also played a lot of The Men Who Would Be Kings - vs Zulus, Boers, Sikhs and even against Garibaldi's Redshirts. A great set of skirmish rules, it looks like we will be hitting the Nile and the Crimea in 2019. We've also been playing Blood Eagle - a skirmish set based in the Viking age. These have been great fun too. 


June this year saw me at the annual gathering of gamers now called The Wild Geese. Admirably organised by Colin (and Katherine!) Ashton, I had some great games with a lovely bunch of chaps. Burning a Zulu Kraal, rescuing the ladies of "Versailles", seeing off the Highland Clans on teddy bear fur and a big battle with loads of old school spencer smiths which really topped off the weekend for me (nice one Will!). Much booze and food was consumed and my table even won the quizπŸ€“. I'm looking forward to next year already.


I also had the opportunity to play several 40mm games with Graham Hilditch. Graham's lovely figures really stand out and together with his excellent scenery have graced many of the reports on the blog. It's always a pleasure to head up for a game and we're planning a SYW campaign to run through 2019. Graham's a nice chap and it's always good to catch up with him. I may even get some 40's of my own to play with!

Figs and Rules
I've not had a lot of time to paint this year but I've really enjoyed the clean, proportionate sculpts from Crann Tara and have some French Calvary and Spanish sitting waiting to be prepped. Graham Cumming also made some special figures for the Sugar Islands and his newest figures are just superb. 

I was lucky to purchase a Sikh Wars set of armies from Graham and am working on some Akali fanatics at the moment to complete the Sikh army. I was also able to purchase a WSS Spanish force from Grimsby lad Paul Robinson and have bought dragoons and artillery from Ebor to paint up. I have made some head swaps using Warlord heads to give me dismounted dragoons too so hopefully these will grace a Lily Banners game sometime soon. 

I'm eagerly awaiting Rebels and Redcoats, Ospreys latest offering, as it will tie in with my next book project and also considering some of Warfare's Cossacks. Helion have a load of books coming which tickle my fancy and I'm planning a trip to Salute next year too.

Well that's all folks. Have a happy Hogmanay. I hope last year hasn't been to harsh, (it's been trying at times for many I know), and that next year is good to everyone.

See you in 2019.


Saturday 1 December 2018

A Sugar Islands Battle - "Surrounded"

A lovely afternoon spent with GrahamH playing the "Surrounded" scenario from the Sugar Islands book today.

In this scenario, representing the British attempting to advance on Port Royal, Martinique, the Grenadiers, Highlanders and 63rd Foot come under attack from French militia and marines.

After a nervous start, becoming shaken by the sniping from amongst the trees , the Grenadiers squared off to take on their attackers on the left flank. They drove off the first unit of French skirmishers with a couple of volleys and changed into the second, scattering it. A unit of militia came up and deployed and a sharp melee ensured. After winning the first round the Grenadiers recoiled but by that time the flank had been secured.


On the right the Highlanders and 63rd faced off against a unit of French marines and a large group of militia (Prussians in disguise! ). 
The highlanders traded volleys with the marines but their shots told more. The marines were first shaken then forced back. The highlanders moved into the undergrowth and followed up their success, drivng back the marines again. The 63rd also had success against the militia. After another firefight they were driven back and the 63rd followed up with the bayonet. In the melee the militia routed back and although they reformed they took another volley and turned and fled. 


The British were now in control of the road, the French had all been driven off. Success like this wouldn't lead to the capture of the island however. All the French units would be able to reform and return to harass the British on the next stage of their march.

A lovely afternoons gaming with Graham's 40mm figures and scenery. Always a pleasure and already looking forward to a game later in the month, using Muskets and Tomahawks to fight the attack on the bastion at Point Negro.

***************************************************************************************

Response to the book has been excellent and copies have winged their ways to Australia, New Zealand, the US, Canada (despite the strike!), the Netherlands, Ireland and France as well as all over the UK. Thank you very much to everyone who has purchased a copy. If you'd like one, drop me a line via the blog and I'll get in touch

Thanks to John Ray who was inspired to run his own version of "Madame Ducharmey's". Please visit his blog and take a look. I think you'll find it quite a spectacle.

Monday 12 November 2018

Sugar Islands on Tour

Some pics from Saturday's game at Targe in Kirriemuir. A very very busy morning filling folks in about the Campaign - it was three hours before I got a chance to sneak off from the table. We played the Attack on Madame Ducharmey's Plantation.


Caught up with CG and GH and have cooked up a few ideas which I will be working on over the next few months. In the afternoon some youngsters arrived and got a chance to play which was nice.

The table took second prize for best scenery which I'm delighted with and I managed to shift a few books too.

Copies of the book are now on their way to Canada, New Zealand and Australia as well as throughout the uk.

Thursday 8 November 2018

NOW AVAILABLE - Wargaming the Sugar Islands Campaign - A Guide to the British Expedition to Martinique and Guadeloupe in 1759

I received the printed copies of the book from the printer today. It has been a quite a journey but I have enjoyed it very much and hope that you will enjoy reading about and gaming the battles and encounters on the islands.

Wargaming the Sugar Islands Campaign is an 80 page A5 glossy bound guide to the British Invasion of Martinique and Guadeloupe. It contains a detailed summary of the events on both islands, the leaders, the forces involved and the islands themselves. There is information on suitable figures, scenery and rule sets to use and loads of period maps detailing the landing areas and land fought over. I have commissioned two pen and ink drawing from Chris Gregg which sit in the centre of the book. Lastly the book also contains 6 scenarios each with a detailed colour layout and with special rules including a simple campaign and special events. 


Contents 

Background to the Campaign
The voyage to the Islands
Martinique
Scenarios for Martinique
Guadeloupe
The Actions on Guadeloupe 
The End of the Campaign
Aftermath
Scenarios for Guadeloupe
Notes for Wargames
Bibliography


Copies of the book are priced at £11.50 a copy (a price rise from 2018's original cost).
(UK 1st std £1.50, Signed for £2.50, EU std £3.50, confirmed £8.50. US £4.50/£9.00, AUS/NZ £5.00/£9.00)

Should you wish to purchase a copy please contact me directly using the contact form on the RHS of the blog. 

Wednesday 24 October 2018

Sugar Islands - at the printer

A quick update to say that Wargaming the Sugar Islands Campaign is now at the printer.

I will have copies with me by the 7th of November.

As stated I will have a number of for sale at the display game run by myself and Oldmeldrum Wargames Group at Targe in Kirriemuir in November 10th.

We will be running Scenario 4 - The Battle for Madame Ducharmey's Plantation on the day.

As soon as I have the books in my hands I will open up for orders.


Saturday 20 October 2018

Wargaming The Sugar Islands Campaign - A Guide to the British Expedition to Martinique and Guadeloupe in 1759

Those of you who follow my blog will know I've been working on this for a while now. The good news is that I received the bound proof copy this morning. I can't see any changes required at first glance so subject to a deeper check and any corrections I should have copies of this for sale within the next  couple of weeks.

I will be selling copies here, via the blog and will also have copies for sale at Targe in Kirriemuir in November.

The book is A5 with a glossy colour cover and 79 with plenty of detailed colour maps of the islands and the areas over which the battle to capture them were fought. There are 6 systemless scenarios each with a colour map as well as details of the forces involved and their leaders as well as notes for a campaign, suitable figures and scenery.

More details will follow when I have the printed copies.


Sunday 14 October 2018

Second Holzende


Holzende - Second Day

I was back up to see Graham H a week past Friday and had another great afternoons gaming with his 40mm figs. They are such lovely toys, well painted and posed and with plenty of characters and vignettes to make a game look like a battle and less like two lines of miniatures facing each other.  This delayed report, (after a hectic week at work) tells the tale of the second day at Holzende .

Neither side felt able or willing to continue the fight from the first day at Holzende and the Austrians were content to let the Prussians retire before they themselves withdrew across the river to await a fresh assault in the morning. 

In the Prussian camp that night officers received a terrible dressing down and the colonel of the Grenadiers in particular came close to being clapped in irons and sent to the King in disgrace! However fresh troops arrived and as dawn arrived scouts reported the Austrians had pulled back. The assault would be renewed, the river crossed and the Austrians driven back down the road toward Prague and away from their Saxon allies.

The Prussians deployed at first light. The Grenadiers and Rgt Von Lehwalt  followed by the Lieb-Garde and Garrison Rgt 11, supported by a medium gun formed the left flank. The right comprised Rgt Itzenplitz, a further medium piece and the Fusiliers of Von Rohr. In reserve stood Cuirassier Rgt no3, ready to exploit any potential breakthrough. The Prussian plan was simple. The strong left flank would force the river, the right would hold in place and tie up as many Austrians as possible, to assist this the Cuirassiers would move across the rear of the position to make it look as if a crossing was planned downstream of the bridge. 


Facing the Prussians the Austrians had deployed the remains of the Likaner Croats amongst the trees and bushes around the bridge. Behind them in line were the regiments of Carl Lothringen and Joseph Esterhazy and in turn behind them were the Austrian Cavalry, Hussars of Paul Esterhazy and Dragoon Rgt Althann together with a medium gun. On the opposite flank the Austrians had placed Rgts Deutschmeister, Botta, a medium gun and in a small wood, Grenz troops from Rgt Sluizner. A grenadier battalion was also on this flank, in reserve. Sitting behind the river the Austrians believed their position to be strong, even though it was clear that there were crossing points. 


The Prussians opened the day's affair by bringing up their medium guns and advancing to within range of the leading regiments battalion pieces. These started to play upon the lines of Austrian troops, concentrating upon Deutschmeister and Carl Lothringen. The Austrian lines were so densely packed they had not brought up their own guns and for a while the Prussians had things all their own way. 


The Grenadiers continued to advance upon the river whilst the move,ent of the Cuirassier across the rear of the Prussian position had an unintended effect - the Hussar and Dragoons turned and did likewise, moving across the rear of their own lines. This completely changed the balance on the Prussian left, making to look like a more even fight. The Grenadiers now reached the edge of the river and began to probe for the ford, shrugging off the mounting casualties which they were suffering. The Austrians seemed to be shooting high however and as many branches fell on the men as did cannon balls. Indeed on the right, Itzenplitz  seemed to have a veritable abattis of branches and trunks surrounding its position. The Prussian gunners were truer in their aim and as the Grenadiers splashed into the ford, Carl Lotharingen began to waver.


Perhaps it was the brave Grenadiers, perhaps the ranks of the Lieb-Garde and Garrison Rgt ll coming up behind them or the steady pounding they were taking from the guns, or even the toll of additional casualties on a unit less then fresh from the day before, but as the Prussians began to cross the river they recoiled, falling back. This exposed Esterhazy's infantry and they refused their flank and suddenly the Austrian left had moved away from their position on the riverbank. Orders were issued and the cavalry hastily recalled, but they way was clear, Prussians could now cross. 


On the Prussian right their artillery had been no less deadly. Deutschmeister was starting to look shaky from the steady fire it was receiving from Itzenplitz and the battalion and medium gun and decided enough was enough and fled behind the Grenadier Battalion. As the Cuirassiers drew up Von Rohr saw this as an opportunity to further press this flank and advanced from its position amongst the wheat, where its men had been sitting calmly untouched. A smattering of fire from the Grenz came from the woods,  but it was becoming clear that the Prussians had the upper hand on either flank. Von Rohr splashed into the river and began to cross.


Back on the left the Leib-Garde has crossed too and formed on the left of the Grenadiers presenting a wall of bayonets. Carl Lotharingen took further casualties and staggered back again, then took to its heels and fled. A forest of muskets now stood on the Prussian left as the garrison Rgt crossed and Von Lehwaldt also moved forward. The Austrian cavalry finally began to arrive after having crossed and recrossed their own lines. The Hussars and Dragoons formed up, ready to attack.


Over on the right the Austrian skirmishers fired off a few shots but fell back. Both Austrian signs were now under threat. The day was drawing to a close. It was clear that a choice had to be made, the cavalry would have to stand and allow the infantry to withdraw. The battle was over and the Austrian retreat had began

Friday 21 September 2018

Oooooops!

Well....what else was I going to do with the garage.....!

I needed to give in to my other vice πŸ˜‚


Monday 10 September 2018

Sugar Islands - Madame Ducharmey's Test Layout

A couple of shots of the test layout for the Madame Ducharmey game from my Forthcoing Sugar Islands Book.

Bases to flock, baricades and some more armed slaves to paint. Wounded markers and some general detritus and clutter to add.

Otherwise I think that's about it.


Saturday 1 September 2018

The Engagement at Holzende

Yesterday I had the pleasure of catching up with Graham Hilditch again and after discussing my progress on the Sugar Islands book and his plans for a display we played a short game in what I hope will become come a series of linked battles over the next few months.

Graham has a wonderful collection of figures for many period but his pride and joy are without much doubt his 40mm SYW unit's. I've not really played with 40mm but the detail and variation in the figures together with the realistic proportions gives them something much more than just extra height as I think you will see from the pictures below.

Graham had set up a few units of Prussians and Austrians from his collection and with only a few hours to play I had taken two copies of Jim Purkey's Minden Miniatures SYW rules with both Graham and I played at the Wild Geese get together in June this year. They're well worth checking out if you like a quick game with plenty of ebb and flow.

Graham commanded the Austrians, 2 regiments of foot with a battalion gun, a regiment of Croats and a regiment of Dragoons, supplemented by a single light field piece. I took the advancing Prussians, leading a converged grenadier battalion, infantry regiment with a battalion gun and a fusilier regiment . As we both hope this will be the first in a series of games I have added a little narrative which will give us a theme to fit the games into.

The Austrian troops formed a bridgehead at the small village of Holtzende, just across the river Mosset. Placed on the west side of the road were the Dragoons of Rgt Althann and IR4 Deutchsmeister with the gun in support. Across the village IR3 Carl Lothringen had deployed, tramping the kitchen gardens of the villagers. Beyond them, in the light woods and fields south of the village a battalion of Likaner Croats lay in wait.

Advancing toward them was a small Prussian force hoping to seize the river crossing and unaware that the Austrians had already got there first. It was not until the 2nd Hussars trotted across some open ground that they noticed the Austrians were in possession of Holzende. The grenadiers of battalion 26/13 blundered round the corner of the road and immediately took fire from Croats on either flank and shot from the battalion gun of Carl Lothringen.  They hastily deployed off the road and into line but not before a further volley hit them. This was too much for the surprised Grenadiers, who could see little of the Croats and only the long white line of IR3 deployed and awaiting them, wreathed in smoke from its gun. They turned and scattered back down the road, straight into the horse of Prince Moritz who tore a strip from their commander and sent them to the rear to reform. The advancing fusiliers of Rgt Von Rohr gave them a few catcalls and whistles as they marched past, ready to deploy into the Croat haunted orchards on the Prussian right.


The Prussian Hussars had heard the gunfire and knew the battle had opened. Ahead of them they could see the Dragoons of Althann formed up and decided that they would be the ones to take the battle to their foe, drew sabres and charged. The caught the surprised Dragoons at the halt, but the charge was in haste and poorly formed, the bigger men and horses of the Dragoons gained the upper hand. Although casualties were even the Dragoons remained steady but the Hussars were shaken and forced back in disorder. 


Back in their fields the Prussians had managed to deploy IR14 Von Lehwalt and it began to advance while the Fusiliers of Von Rohr began their advance through the woods on the right. Between them the two regiments drove back the Croats and restored some order to the Prussians. 


On the left however the Austrian Dragoons were not done with the Hussars. Both sides had reformed and when the Dragoon sounded the charge the Hussars galloped toward them. The two sides clashed and again it was the Dragoons who got the upper hand and again the Hussars were sent back. Desperately their commander tried to rally his men but it was not to be and the left the field in some disorder. The Dragoons had moved too far forward however, the Hussars defeat had unmasked the Prussian gun which no fired into the Austrians. Exposed and without support they turned and retired somewhat precipitously toward their own lines.


The crisis point of the battle had now been reached, the Austrians had brought up their second infantry regiment and their cannon and were awaiting the Prussians who were now moving through the wheat fields on the left, having finally cleared the Croats from their path. Von Lehwalt emerged from the crops and opened fire with its battalion gun and fired a volley into Deutschmeister. The Austrians replied causing the Prussians to waver but hold. On the right Von Rohr fired to clear the remaining Likaner Croats, but failed to do so and they remained in place, screening the men of Carl Lothringen from theFusiliers  advance.


The next turn would decide the engagement....


But you'll have to wait because that's all we had time for!

Thanks for the game Graham, look forward to continuing it. Hope you liked the place names!