Showing posts with label ACW. Show all posts

Tuesday, 3 January 2023

1st Game of the Year - the End of the Glen Campaign

 Let off the lead today to play a game with Graham H.

We decided to finish off the intermittent Glen Campaign which we have been running. After several skirmishes the two sides faced off near Skene, the town sitting at the gap where the Glen turns into the Valley. Here the three Union commands faced down the two remaining Confederate commands which had taken up position in a sunken road just outside town. This provided a good deal of cover and Graham deployed most of his units along its length, but threw two out behind the cover of a small wheat field in order to blunt the Union advance. I had the advantage of numbers, but most of my command were green recruits, leavened with 3 veteran units and some sharp shooters. Not the 3:1 odds I needed to take a defended position, but I hoped to be able to soak us some damage by not getting into to many firefights....


Pickett's charge....union style! 


The Union Army begins its advance


The Confederates await. 


Action across the field. Union gain the upper hand on the left and right flanks but are driven back initially on the latter despite artillery reinforcement from the Rebels.


But breakthrough is achieved and the remaining men in grey and butternut are driven off the table. 

The game could have gone the other way, but my morale tests were good, even for the green units and casualties were spread over the whole command. Graham's men did benefit from cover but I went in with the bayonet which seemed to do the trick, although accurate fire from the Sharpshooters caused a lot of disorders. Graham's fire did have some effect - the central Union brigade was badly cut up, but held long enough to push through with the veterans on the left to win the day and end the campaign. 

A great way to kick the year off. Much plans for 2023 were made too - including hopefully putting on display games at Falkirk and Kirriemuir. 


Tuesday, 26 July 2022

For Sale - Figures

 After clearing out some books I decided to take a look at some of the armies I have not used for some time. 

First of these is my late medieval "Army of the Archbishopric of Hoegaarden" actually a mix of late 100yw figures from Perry and Citadel (ex Bretonnian Halberd and Spear) with few Front Rank figs added. These were professionally painted and the level of detail in them, especially the command figures is quite high. There are 208 pieces (cav and guns as 2pcs). 


I'm asking £475 for this army inc Uk postage.


The second set of armies which I am selling in my ACW collection. I have not used these for a good while. But there are two decent sized forces here -


There are; 

168 pc confederate army

124 inf, 12 cav, 2 guns and 4 crew ea, 4 casualties and 2 mtd command


169pc union army

121 inf, 12 cav, 14 dismounted cav, w/8horse and horse holders, 2 guns and 4 crew, 4 casualties, 2mtd commanders


Total of 337pc 


Plus Confederate ambulance and union prisoners vignettes 17pcs


Grant total 350pcs @ £2 per pc = £700 inc Uk Postage. More pics available


ACW STUFF NOW SOLD


Thursday, 16 June 2022

Holiday Gaming - Part 3

 The Glen Campaign 2

To Forres yesterday for another game from our "it's not quite the valley as you know it" Rebels & Patriots 40mm Skirmish campaign. 

As we left it Confederate Captain Dashing moved from Kintore to Machar and attacked Union General O'Neil with his small mixed force. We had rolled the Bullets and Beans scenario which meant that I, as O'Neil was in camp when Dashing appeared with 4 units of infantry, (inc one vets and one with obsolete weapons) and a gun. My 3 infantry units and a gun (ie the units which O'Neil had available - 1 vet, 1 reg and 1 green unit) were in camp and only one unit could occupy each of the 4 sections meaning Dashing had the advantage, despite the cover offered by the camp. 

Things got off to a dodgy start when my Irish vets became disordered and withdrew from their section but the following turn the regulars delivered a stiff volley and the gun sent canister into the advancing confederates. This coupled with Grahams units getting tangled and masking his gun gave me a breather and I was able to drive the confederates back while I rallied my men. 


The battle was not to go all my own way however - with his line of fire now cleared Graham was able to whittle down the crew of my gun and force it back. I threw my green volunteers forward to occupy the now empty sector and they were able to hold on while the Irish and the regulars blazed away. The order began to turn and along the Irish and the gun were worn my other two units had no hits. Graham had taken some hefty volleys and lost the first of his infantry units, followed by a second a few turns later. Turn 7 rolled round and the confederates were on the edge of the camp. 


Another turn (8) of  union fire kept them out and caused a second unit to break, but all of my units were now disordered though only with light casualties. Graham had lost a second unit from disruption and we rolled the die for the end of the game...and it was all over. My men had managed to just keep the confederates out of the camp and had suffered  lighter casualties. The confederates had suffered from accurate musketry and couldn't quite get into the camp. 


We totted up loses and wrote orders for the next turn. This time Stuart led his detachment down to Kintore while O'Neil advanced from Machar. This move trapped Dashing in his camp - the boot was on the other foot. But the confederate camp was an all together more solid affair  and Stuart, reinforced by O'Neils artillery would have his work cut out.

Dashing cut off in Kintore by Stuart and O'Neil

Overall this is turning out to be a neat little campaign. The rules in Rebels and Patriots are able to handle this extra dimension driving the game and the campaign setting and mechanisms are able to fit with the rules. I can see this map being used again for campaigns a bit closer to home, perhaps the retreating Jacobites and their Hanoverian foes, the Earl of Mar and the Lord of the Isles and Bruce and the Comyns, all of whom stomped over the same ground. 

Tomorrow I leave for Kenilworth for the much delayed Wild Geese 2020 nope, 2021 er make that 2022 weekend. That promises to be a great weekend and finale to my hols. 3 years since our last weekender this is going to be special.

Friday, 10 June 2022

Holiday Gaming part 2 - The Glen Campaign

 For my second holiday game I was up at Graham H's where we kicked off our 40mm ACW campaign using the simple rules and map which I knocked up a short while back. 

This was not a detailed reflection of military strategy and tactics...just an mechanism to get some games played in a sort of framework, and it looks like it's done its job!

We drew up our armies, 10 units of infantry, (including a mix of green, regular and veteran types, aggressive confederates and a sharpshooter unit for the union) and 2 squadrons of cavalry and 3 guns each. We also rolled up 3 officers - A major and two captains, each with their own traits. 

Starting off at our depots we wrote orders for our commands and then revealed them. The first move didn't see any action but soon my Union Captain Chambers bumped into Confederate forces under Captain Flash in some woodland near Harlaw. 

As defender, my role was to get my forces off the table ....the table diagonally opposite where I  was positioned and with a mixed bunch of 1 green, 1 regular, a small unit of sharpshooters, cavalry and a gun my job wasn't going to be easy. Graham had two regulars, a veteran unit and a gun in the woods to my left. 

I needed to get off the road and into the woods in my right and get up the table as quickly as possible so I used my sharpshooters and cavalry as a screen to hold off a unit of regulars which I could see coming off the road to block my path. I got my green troops moving and screened my flank with my gun and regulars, opening up with the former at Graham's vets who were moving through the clearings to attack. 

The cavalry dismounted (normally cav can't use the fire order, but this seemed appropriate for civil war period cav), but their carbines didn't have the range to engage, so they moved up. This brought them into range of the confederate regulars who gave them a heavy volley and sent them scuttling back onto their horses. The sharpshooters did more good though and a firefight opened with the rebels, my men picking off troops without much of a reply. 


On the road my gun was now under fire from Graham's own artillery, but they had held up the veterans and allowed my green troops to get deep into my side of the table and up towards their objective. My regulars now turned and fired on the confederate regulars who were closing in and this allowed my gun to limber up and get away - just in time. Id lost most of the crew. The game was now becoming a race to see if I could get my men off the corner zone or if Graham could place his men across the line of advance and block it. 


First off were the cavalry, at 50% they'd lost too much to take part in any further fighting. My green troops  were next, as the door began to swing shut. I got my regulars across and my badly damaged gun and my still fresh sharpshooters just a move or two away, but now Graham had men in place. His own casualties were mounting though and the end of the game was looming. I fumbled my activation for the skirmishers so they didn't get off but Graham had taken too many hits as his gunfire was not causing any casualties. With that the dice was thrown and the game ended. 

I narrowly squeaked a "victory" of sorts....I managed to get enough troops off the table to gain some honour, but Grahams high casualties and lack of hits on my men meant Captain Flash wouldn't be getting the honour of a mention in despatches to Richmond. My men made it back to the main body under General Stuart at Harlaw and I'm sure Captain Chambers would have had some explaining to do.

We worked out our casualties and wrote orders for the next move. Holding the central position General Stuart decided to hold with Captain Chambers at Harlaw. Captain O'Neil was at Kemnay and had settled down for the night with his small force in camp when the pickets sounded alarm.....


To be continued....


Monday, 18 April 2022

Rebels and Patriots ACW Campaign Rules?

 A question mark, in case they don't work! Knocked up at lunchtime...


The Glen Campaign of 1862.

The Shenandoah Valley runs geographically from northeast to southeast West Virginia. During the American Civil War, it was hotly contested by both sides.

One of the “spurs” of the Valley was extensively colonised by Scots in the 18th century and thereby earned the nickname of “The Glen”. This too was hotly contested, though with far fewer men and in a far less well-known campaign.

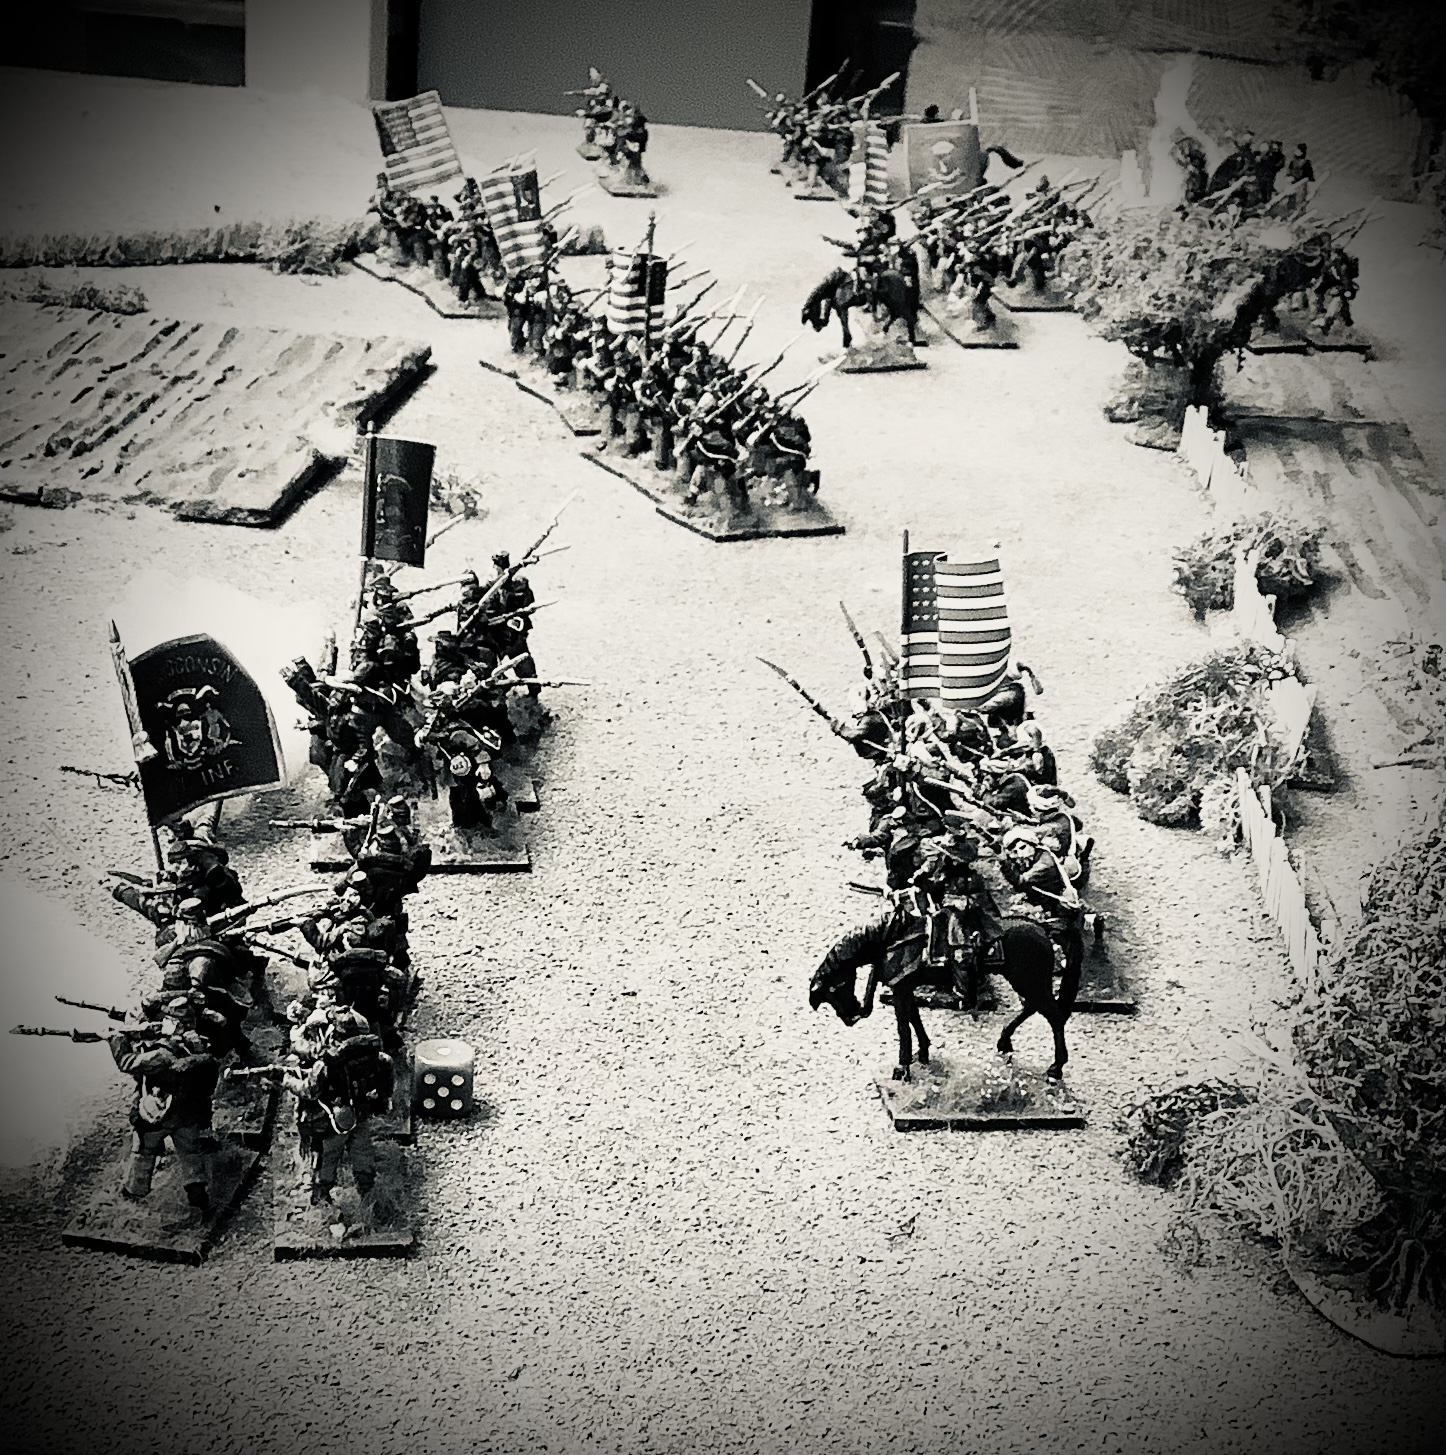
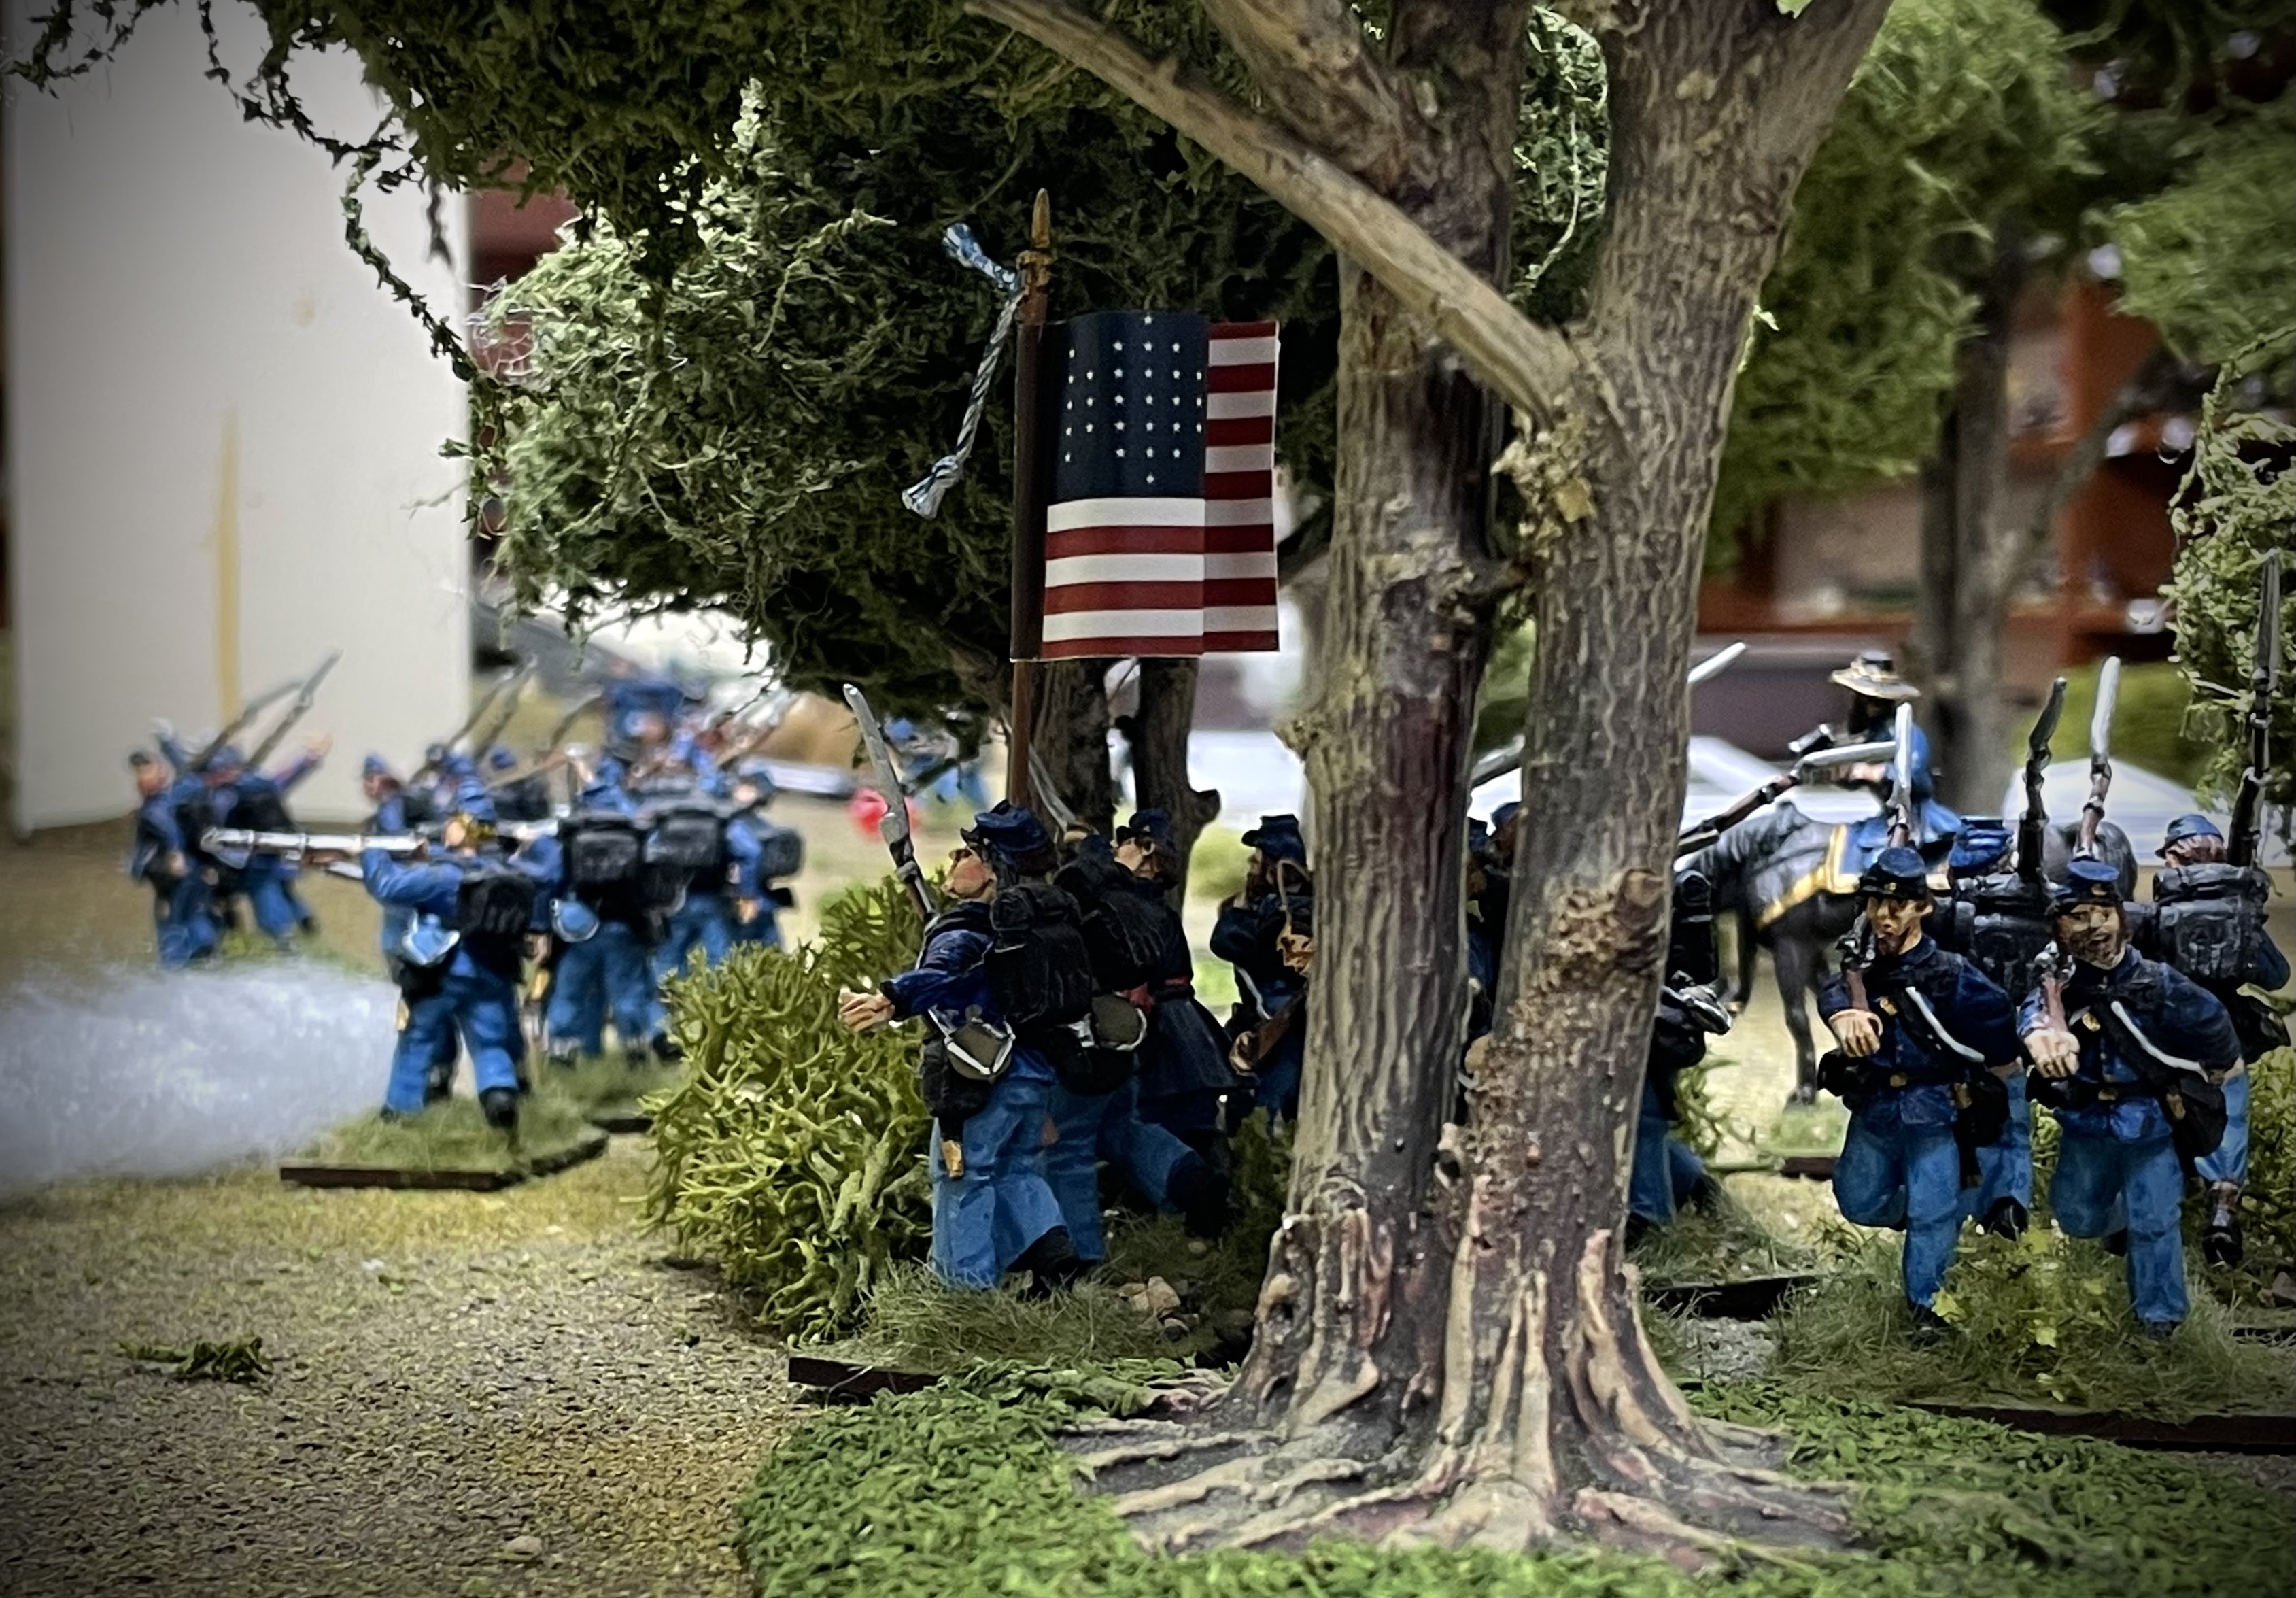
The Confederate General Graham and his counterpart in the Union General Stuart each commanded a small, detached brigade of men and played a game of march and counter march, skirmish and encounter to capture and deny the other the key towns and river crossings of the Glen. Each hoping thereby to prevent the area being used to move troops around the flank of the main armies operating in the Valley. Truth was however, that both sides original orders became lost and in a confusion of paperwork, poor administration, geography and couriers with a lamentable sense of both duty and direction the main armies of either side lost contact with these commanders. Instead they were left to persecuting the war to their own devices for some time until being recalled somewhat embarrassingly by their superiors and promoted to keep their silence. Thus, the campaign was lost to history and forgotten, until now.

Campaign Rules

 Units

Each side has a pool of units to select from. They may field up to 24 points of units from that pool. However, as each unit takes casualties and suffers the affects of the campaign it will diminish and may be removed from the roster. The winning side in each encounter regains half its casualties from the battle, the loser, a quarter. Guns which lose their entire crew however are considered lost due to damage if they are not physically captured. Units may not be combined. Thus a unit will fall in strength and points value until it is too small to take part in the campaign.

The player may modify the profile of the unit as per the rules, for example making them veterans. The cost to do so is paid as normal.

Each side also has their General and a Regimental Colonel and Major to support them. Each General has 2 traits and their Colonel and Major have 1 each. One officer may accompany the detachment send to carry out a mission, (i.e. complete a scenario). They player is free to select which, but should they be slain or wounded the game rules apply as normal and they are not replaced. Should any side lose their officers then the game is over as their toops, lacking orders, surrender.

The Pool of Troops

• 10 companies of infantry – May be any class. Each coy is a unit from the rules (ie 6 or 12 figs)

• 2 squadrons of cavalry – May be skirmishers only. No shock cavalry. Each sqdn = 6 figs.

• 1⁄2 Battery of 3 guns – May only deploy a single gun per scenario. Cost of a limber is as per rules. Medium Guns only. Guns without Limbers may not move other than to turn.

• Ad-hoc specialists – the player may draw such men as required should a scenario so require.They do not count as a unit unless described as such in the scenario. 

Movement

The Union Player starts the campaign in Meldrum, the Confederate in Skene. Each player draws up their 24 point detachment for the mission ahead. They then write down where it is and where it is moving to on a piece of paper, folds it and hands it to their opponent simultaneously. Should the two forces collide then a battle is fought using the scenario generator from the rules. If not, then the detachment makes its way peacefully to its destination. Note movement may only be made along roads and rivers crossed only at a bridge. But the battle takes place anywhere along the road between the two points.

Should there be less points allocated to either side in the scenario to be played out, the player may only select the units which he has ordered to move to take part in the game. The rest are assumed to be off table. They may provide reinforcement, should such a benefit be rolled for in the game. Otherwise, such men come from the main pool or are sent from the main army in the Valley.

The Scenarios

The scenario (from the book)  is played as normal. Any odd situation caused by the campaign rules conflicting between the scenario and the rules should be resolved amicably by the players. The winner achieves the benefits stated in the scenario and is able to recover 50% of his loses. The loser is denied any benefits and only recovers 25% of his loses. The losers troops also return to their start point or back to their Depot of Meldrum or Skene, or away from the enemy if unable to do so.

Ending the Campaign

The Campaign ends when either side loses its depot or does not have the required 24 points in order to be able to field a detachment for a scenario.

So....give it a go..or wait to see how the results pan out. And in case you're wondering, the Glen is the Garioch, home of the Oldmeldrum wargames club!

Sunday, 17 April 2022

Rebels and Patriots - ACW

 Yesterday I popped up to see Graham H. We had planned to go to Culloden to attend one of the talks there, but got the days muddled. So instead we had a couple of games with Grahams fine 40mm ACW collection, which hadn't had an outing for quite a long time. 

To keep things simple we used the suggested army lists in the rules, picking two mid war sides. Some terrain was placed, a long road crossing a river with a stone bridge, and a church, quite an idyllic scene til the soldiers came!

The first game kicked off with Graham's Confederates advancing along the road over the bridge and deploying onto the southern side of the river. My union troops were a mix of veterans and green men, and the latter proved somewhat tardy getting off the road and into line. I had enough time to get a line of my Irish veterans out before the firing started. Graham started to move round my flank, but his gun was soon masked by his own men and was forced to redeploy onto the bridge. My new recruits were still sluggish, and at one point panicked and fired on their own men, but later  I received some reinforcements from the rear and eventually got myself sorted into two lines, bringing a halt to the Grahams advance. 

The Irish took several casualties and were forced back, luckily to a more protected position. My gun was now in action and wearing down the rebels to my front and the men in grey were taking casualties from my springfields too. My recruits were now in position to the right of the Irish and in time to catch a unit of rebels as they advanced over a hill. They opened up and the Irish managed a double volley and Grahams men were forced back. 


With the union troops gaining the upper hand and high casualties amongst the confederate ranks, it was time to call it quits for lunch.

After sandwiches in the patio in the warm Moray sun, it was time for game two. This time with early war forces from the book. Green infantry for me, supported by a gun and aggressive inf, a unit of cavalry and a gun for Graham. 

This time the terrain was more open the table being nipped in at its waist by two wooded areas, a cabin on the left and the county church on the right.

The confederates advanced quickly, cavalry galloping to the cabin and taking up skirmish line behind its picket fence. The rest of Graham's men headed for the church woods. Again my troops were sluggish and difficult to get moving, but I uncovered my gun early and this meant I was able to score some early hits. 

When I did advance I got the cavalry winkled out from behind the fence and drove them off and swung my line across the table. Grahams men were in the woods, and I couldn't get my troops to go in and get them - sevens to activate, kept rolling six. So a firefight erupted, and gradually I was able to bring my numbers to bear, although again the gun did most of the killing. Although my activations were poor, my morale tests were good and my troops held their positions, whilst the rebels were whittled down. 


Two quick games was good fun. Rebels and Patriots is a good system, though the guns were probably too much for skirmishes. We intend a to have a mini campaign, giving each player a few named units to draw on, and a few officers to lead them. This will let the units gain some history and the leaders some honour and add a bit of flavour to the games,

Wednesday, 26 April 2017

ACW - Fox's Gap, 1862

We make a habit of playing several games of a period or ruleset over a month at my local club - that means we all get a chance to take part, all get a chance to remember the rules and usually have a big game on a Sunday as well. 

This month it's been the turn of ACW - something we have not played for a while. We gave Mr Lincoln's War a go. These are an excellent set for simulating how battles were fought - but the text is. To easy to follow and for a club game they are a little restricted for an evening. 

We gave Regimental Fire and Fury a go next. Concerned we would need big units we made the decision to count our 40mm sq bases as two stands. That made a significant difference and we got to grips with things very easily in the following games. Now we use a casualty marker to represent the loss of a stand and take a base off once two stands are killed. 

Last night we refought Fox's Gap - a battle from the South Mountain series of engagements in 1862 between McClellan and Lee using a scenario from online. With a couple of brigades and a short duration it was the perfect Tuesday night battle.

The Union player (me!) waited until his full force was available before making a concentrated push for the crest. With hindsight this may have left things a little late,  but the Confederate fire was so hot (several repeated 10 's for effectiveness) that the union was thrown back.  As the second brigade came on and started to advance up the slope it was clear there wouldn't be enough time to press the attack on the outnumbered Reb's and they claimed victory. 

Had we had a few more turns I'm fairly certain the union would have pushed them back, much as their historical counterparts did. 

We had a great game and everyone is fairly up to speed with the rules now and happy with the set we have chosen to stick with. Below are some "aged" piccies. Hope you enjoy. 

Sunday's big game will also be ACW.

 
Confederate on the left, Union right 

 
Union first assault on the head of the pass.

 
Waiting over the crest.


The fight for the northern edge of the field, near the Wise House.

 
Towards the end of the game, the first federal attack halted, while to the rear, the second federal brigade begins to arrive and deploy.

Friday, 7 April 2017

And now the 19th....

We have had a few ACW games at the club - a few of us have armies and scenery and it's been a while since we played. As always the question of rules comes up and we thought it time to have another crack at Mr Lincoln's War.


These are a set of rules which set out to recreate the systems and tactics of the Civil War. They're not a fast play set and take a bit of getting used to but boy do they look the part.


But, and there is a but, they don't exactly clip along. And they are difficult to learn. Rewarding, yes but perhaps not for a club night.  So next week we will try the more playable but less realistic Regimental Fire and Fury. 


I have heard of a set called Gettysburg Soldiers which seem good and I am planning to add a set to the rules shelf in the future.